Running Apache Wicket in JBoss
There are several articles available seperately on writing wicket apps and configuring JBoss. But there aren’t enough article which joins both the world. This article is an attempt to provide a tutorial to install, configure and run Wicket apps inside JBoss application server. I’ve used Eclipse as my IDE.
Initial Setup
-
Get the latest version of JBoss server , eclipse and latest stable release of apache wicket.
-
Unzip the JBoss server to a folder eg:
/servers/jboss -
Unzip the apache library to a folder eg:
/lib/wicket -
Install your eclipse in your application folder.
Write the Hello World! app using wicket framework
Before getting to start with writing the app code, a breif intro about Wicket is necessary ( if you are not aware of it). Apache Wicket team is have a great documentation, but to summarize long text short, Wicket is a presentation framework built on Component based development model, which helps to write the entire presentation layer as different components (eg: a <span/> tag is a label component in Wicket) and make it re-usable. Or in other words, it is an alternative framework for JSF, JSP in JEE architecture, which provides similar and additional features to develop the presenation layer.
There are following parts to write the Wicket web application contains following parts
- Wicket Web Application
- Wicket Web Page Component & Wicket components equivaluent to HTML components
- Real HTML Page for Wicket Web Page
- Configuring WicketFilter in web.xml
- List of core wicket libraries.
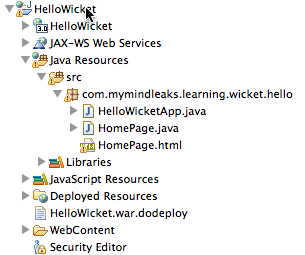
This is how a wicket eclipse project should look like.
Create Wicket Web Application - HelloWorldApp.java
Creating a instance of WebApplication class will lead to creation of WicketServlet i.e a Servlet which helps in receiving HTTP methods and respond accordingly. Think of this as the HttpServlet in other frameworks. Subclassing this class will help to configure your application instance settings like life-cycle settings etc.,
Create HelloWorldApp.java by extending the org.apache.wicket.protocol.http.WebApplication.
package com.mymindleaks.learning.wicket.hello;

import org.apache.wicket.Page;
import org.apache.wicket.protocol.http.WebApplication;

public class HelloWicketApp extends WebApplication {

	@Override
	public Class<? extends Page> getHomePage() {
		return HomePage.class;
	}

}
Create Wicket Web Page Component - HomePage.java
HTML pages are defined as WebPage in wicket. A WebPage defines a complete HTML page and it is the base class for HTML pages. You can derive your own WebPage class to define a standard of how the web page in your application should look like
package com.mymindleaks.learning.wicket.hello;

import org.apache.wicket.markup.html.WebPage;
import org.apache.wicket.markup.html.basic.Label;
import org.apache.wicket.request.mapper.parameter.PageParameters;

public class HomePage extends WebPage {

	private static final long serialVersionUID = 1L;

	public HomePage(final PageParameters parameters) {
        add(new Label("message", "Hello Wicket, Welcome to the World!"));
    }

}
The above java code, define a HomePage with one label component with a text. This label component can be used with any valid HTML tag.
Creating a real web page - HomePage.html
Now the java code for the web page is complete. But for browser to understand and render, it requires HTML page. So, create a HTML page with the same name as of Java class name.
In this code, I’ve applied the label component to the h1 tag.
<!DOCTYPE html PUBLIC "-//W3C//DTD HTML 4.01 Transitional//EN" "http://www.w3.org/TR/html4/loose.dtd">
<html>
<head>
<meta http-equiv="Content-Type" content="text/html; charset=UTF-8">
<title>Learning - Wicket - Hello World</title>
</head>
<body>

<h1 wicket:id="message"></h1>

</body>
</html>
In the code <h1 wicket:id="message"></h1>, tag wicket:id helps the wicket template compiler to apply the data appropriately.
Libraries required to run Wicket
You might have come across tutorials mentioning to use Maven to configure the wicket app. This is a cool way to configure the app, but if you are a geek, you need to see what are the real jars that a simple app like this require.
All you need is these 3 jars.
- wicket-core-1.X.X.jar - contains all classes required to write your application, pages and markups
- wicket-request-1.X.X.jar - contains classes that handles the request & response mechanisms
- wicket-util-1.X.X.jar - utilities that helps the above two jars works fine
Add the above jars to your eclipse Build path. Make sure your app doesn’t have compilation errors.
Configure the WicketFilter for your app
Open the web.xml and create an URL pattern and a filter for the url. So, this makes every HTTP Request go through the WicketFilter and the content is processed by WicketServlet (Sevlet? Yes,wicket infrastructure takes care of it).
<display-name>HelloWicket</display-name>
 <filter>
  <display-name>WicketFilter</display-name>
  <filter-name>WicketFilter</filter-name>
  <filter-class>org.apache.wicket.protocol.http.WicketFilter</filter-class>

  <init-param>
   <description/>
   <param-name>applicationClassName</param-name>
   <param-value>com.mymindleaks.learning.wicket.hello.HelloWicketApp</param-value>
  </init-param>
 </filter>
 <filter-mapping>
  <filter-name>WicketFilter</filter-name>
  <url-pattern>/*</url-pattern>
 </filter-mapping>
Configure JBoss for Eclipse
I do not want to re-invent the wheel by writing my version of JBoss eclipse configuration. Read here on how to configure JBoss in eclipse and read this if you have old versions of JBoss. If you have latest version of Eclipse i.e Indigo, then you could use Eclipse Marketplace which helps to install jboss eclipse tools without hassel.
Configuring JBoss to run the application
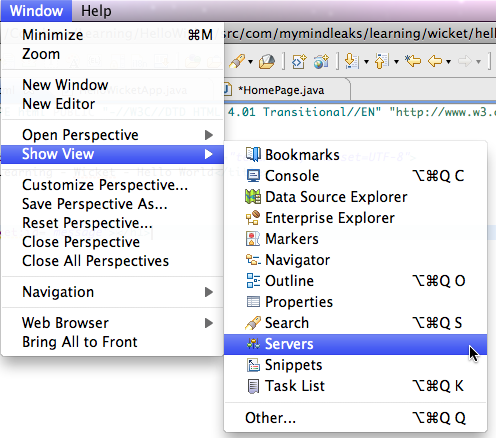
Open the Servers View in eclipse from `Window > Show View > Servers”
Then right click to create a new eclipse server type with JBoss instance.
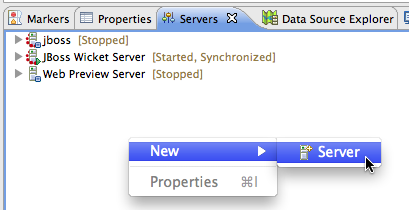
Select JBoss AS 7.X from the menu

If you are first time configuring the server, add the JBoss runtime from your box to eclipse.

Once you have added it server, you should see an eclipse instance of server created in the view.
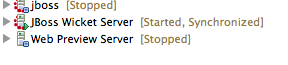
Now start the server and you should see server started successful message in the Server view as well as in the Console view.
23:56:35,966 INFO  [org.jboss.as.remoting] (MSC service thread 1-4) JBAS017100: Listening on localhost/127.0.0.1:4447
23:56:35,970 INFO  [org.jboss.as.remoting] (MSC service thread 1-1) JBAS017100: Listening on /127.0.0.1:9999
23:56:36,301 INFO  [org.jboss.as] (Controller Boot Thread) JBAS015951: Admin console listening on http://127.0.0.1:9990
23:56:36,301 INFO  [org.jboss.as] (Controller Boot Thread) JBAS015874: JBoss AS 7.1.1.Final "Brontes" started in 15171ms - Started 134 of 209 services
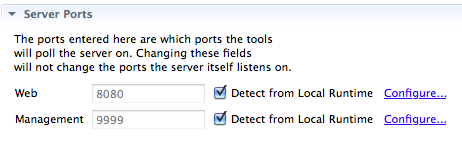
Server console logs will help to know in which ports app and admin console is running or double click on the “JBoss instance” in the servers window and you will see the server property page.
Launch the app at http://localhost:808/<your-url-pattern>